When the proposal is ready, the top of the page will display the customer name (“Tutorial”)and the name of your proposal (“Tutorial Test”).
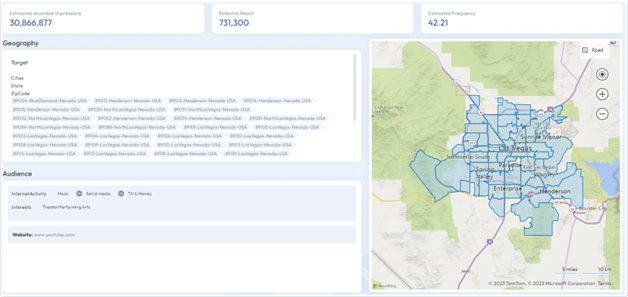
Below this information, you will find the Estimated Available Impressions, Potential Reach, and Estimated Frequency. Estimated Available Impressions is the sum total of impressions across all channels. Potential Reach is the highest number of reach from any channel. Estimated Frequency is the frequency at which an ad could be delivered to the audience with a limitless budget.
The geography, audience targeting selections, and web address are shown on the left and on the right a map showing the selected geo.
Scrolling down, you will see the Keywords listed on the website. Selecting View Keywords Details will generate a pop-up with a breakdown of each.
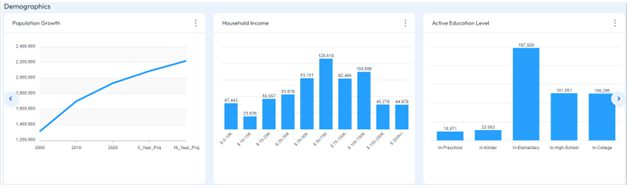
Below Keywords you will see the section for Demographics. Reporting within these sections cover the following: Population Growth, Household Income, Active Education Level, Highest Education Level Attained, Military Status, Ethnicity, Female Population, Male Population, Home Fuel Source, Housing Unit Age, Rent, and Home Value.
Each of these graphs can be downloaded individually by selecting the three dots in the upper right corner and choosing either SVG or PNG format.
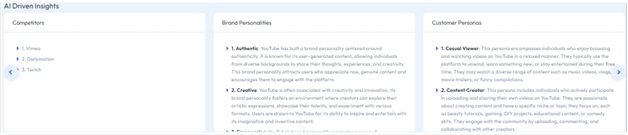
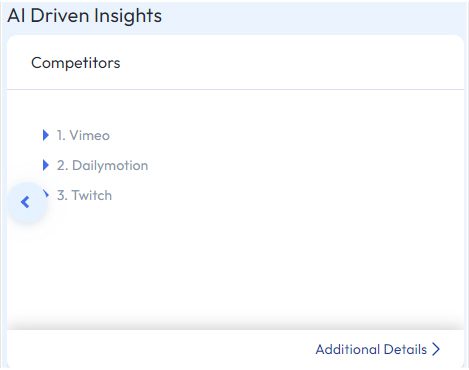
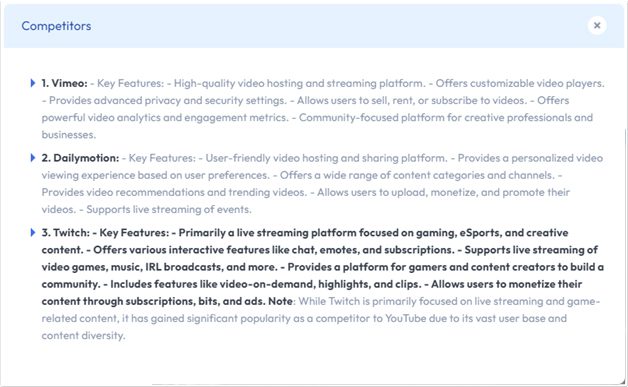
AI Driven Insights generates AI insights for your Avail. Generating content relating to your selected Industry, Competitors, Brand Personalities, Customer Personas, Pricing Strategies, Customers Complaints, Current Trend, SWOT analysis, Success Factors, and Optimal Marketing.
Hovering over a section will allow you to drill down and receiving additional insights into that section by selecting ‘Additional Details’.
How to Generate a Custom Budget
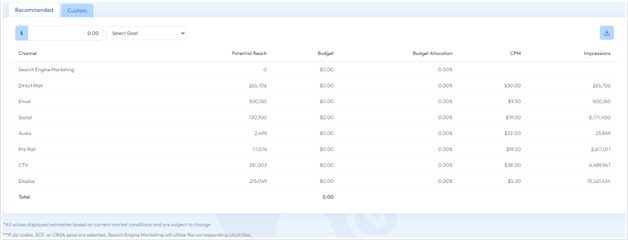
Below AI Driven Insights, you can access the Budget tool for your avail.
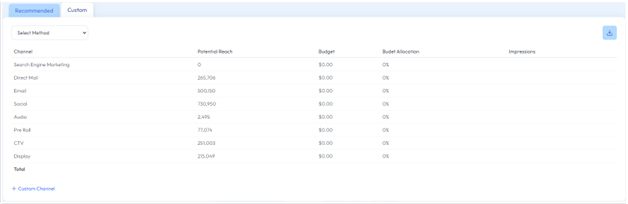
The Budgeting table is divided into two separate tabs: Recommended and Custom. The Budget, Budget Allocation, CPM (Cost per thousand impressions), and Impressions columns are dynamic and will adjust as you enter a budget total and select your goal. Each goal contains a different set of allocations and will provide different results in all of the dynamic columns. Each of these can be downloaded as an Excel, Powerpoint (PPT), or PDF by clicking on the download icon in the upper right corner.
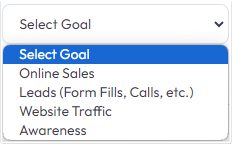
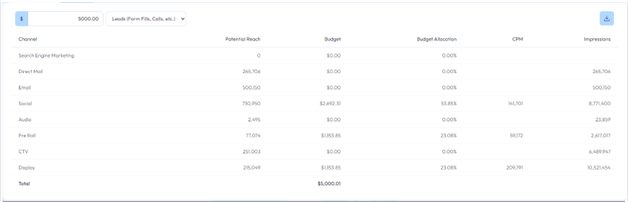
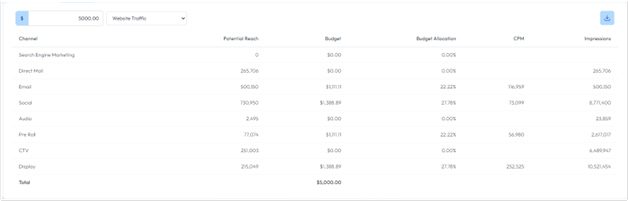
With this walkthrough, we will be using a campaign budget of $5,000 and will be selecting each of the available goals to demonstrate the dynamic ability of the tool.
Online Sales allocates the total budget as follows: 33.33% into Social, 33.33% into Pre Roll, and 33.33% into Display.
Leads allocates the total budget as follows: 35% into Search Engine Marketing, 35% in Social, 15% in Pre Roll, and 15% in Display.
Website Traffic allocates the total budget as follows: 22.22% into Email, 27.78% into Social, 22.22% into Pre Roll, and 27.78% into Display.
Lastly, Awareness allocates the total budget as follows: 14.28% into Direct Mail, 14.28% into Email, 14.28% into Social, 14.28% into Audio, 14.28% into Pre Roll, 14.28% into CTV, and 14.28% into Display.
How to Generate a Custom Budget
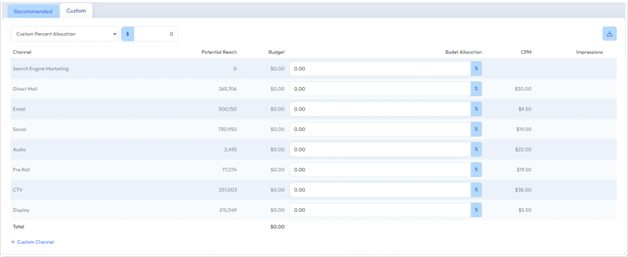
If the Recommended Budget does not fit your needs, you can select the Custom tab to make adjustments to the table.
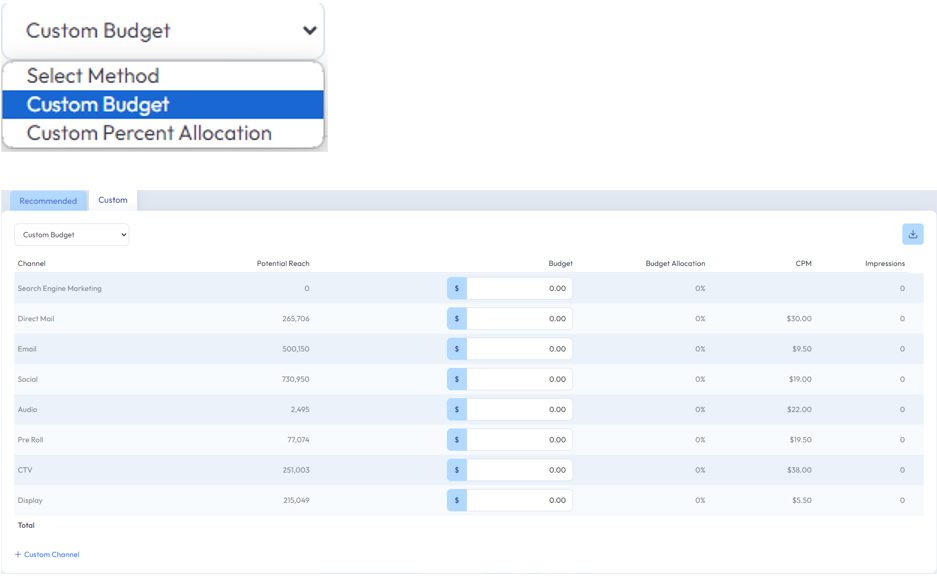
By moving over to the Custom tab, you can adjust your campaign by either the Budget amount or Budget Allocation by clicking on Select Method and picking one.
The fields of Budget and Budget Allocation will remain blank until you select the method you wish to use. For this next part, different dollar and percentage amounts are used.
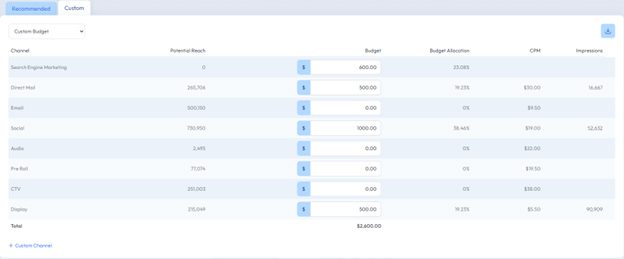
After Custom Budget is selected, each Channel will allow input for the dollar amount you chose for that specific channel.
Budget Allocation, Impressions, and Total will populate with data as you progress through the input selection.
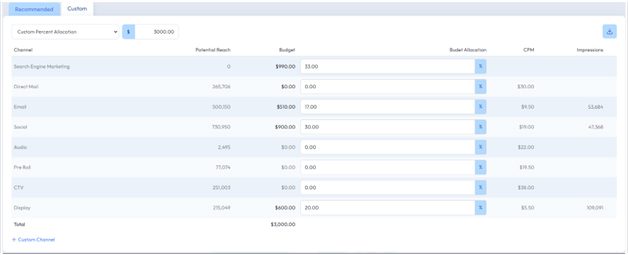
After Custom Percent Allocation is selected, each Channel will allow input for the percentage amount you chose for that specific channel. You will need to first input the budget amount next to the drop-down selection of Custom Percent Allocation to proceed.
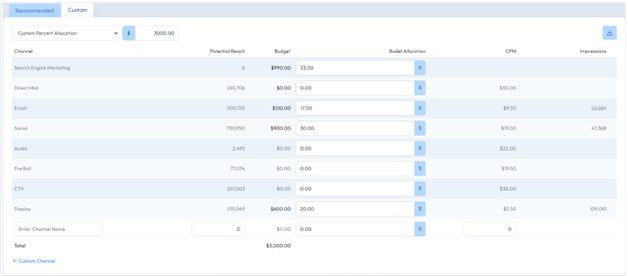
You can add custom channels by clicking on the blue Custom Channel text located under the Total text. A Custom Channel added to one method will carry over to the other method. You will need to update the amount or percentage within this channel when you change methods.
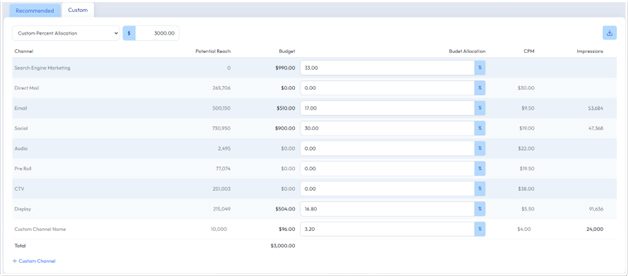
After inserting your Custom Channel name, the potential reach, and your desired budget allocation, the impressions will populate in the right column. You will need to enter the Potential Reach and CPM value before entering the Budget Allocation %.
Each custom channel you create can be edited and deleted on screen.
Fill Out this short form to view library
Yielding progressive results with agile methodology